
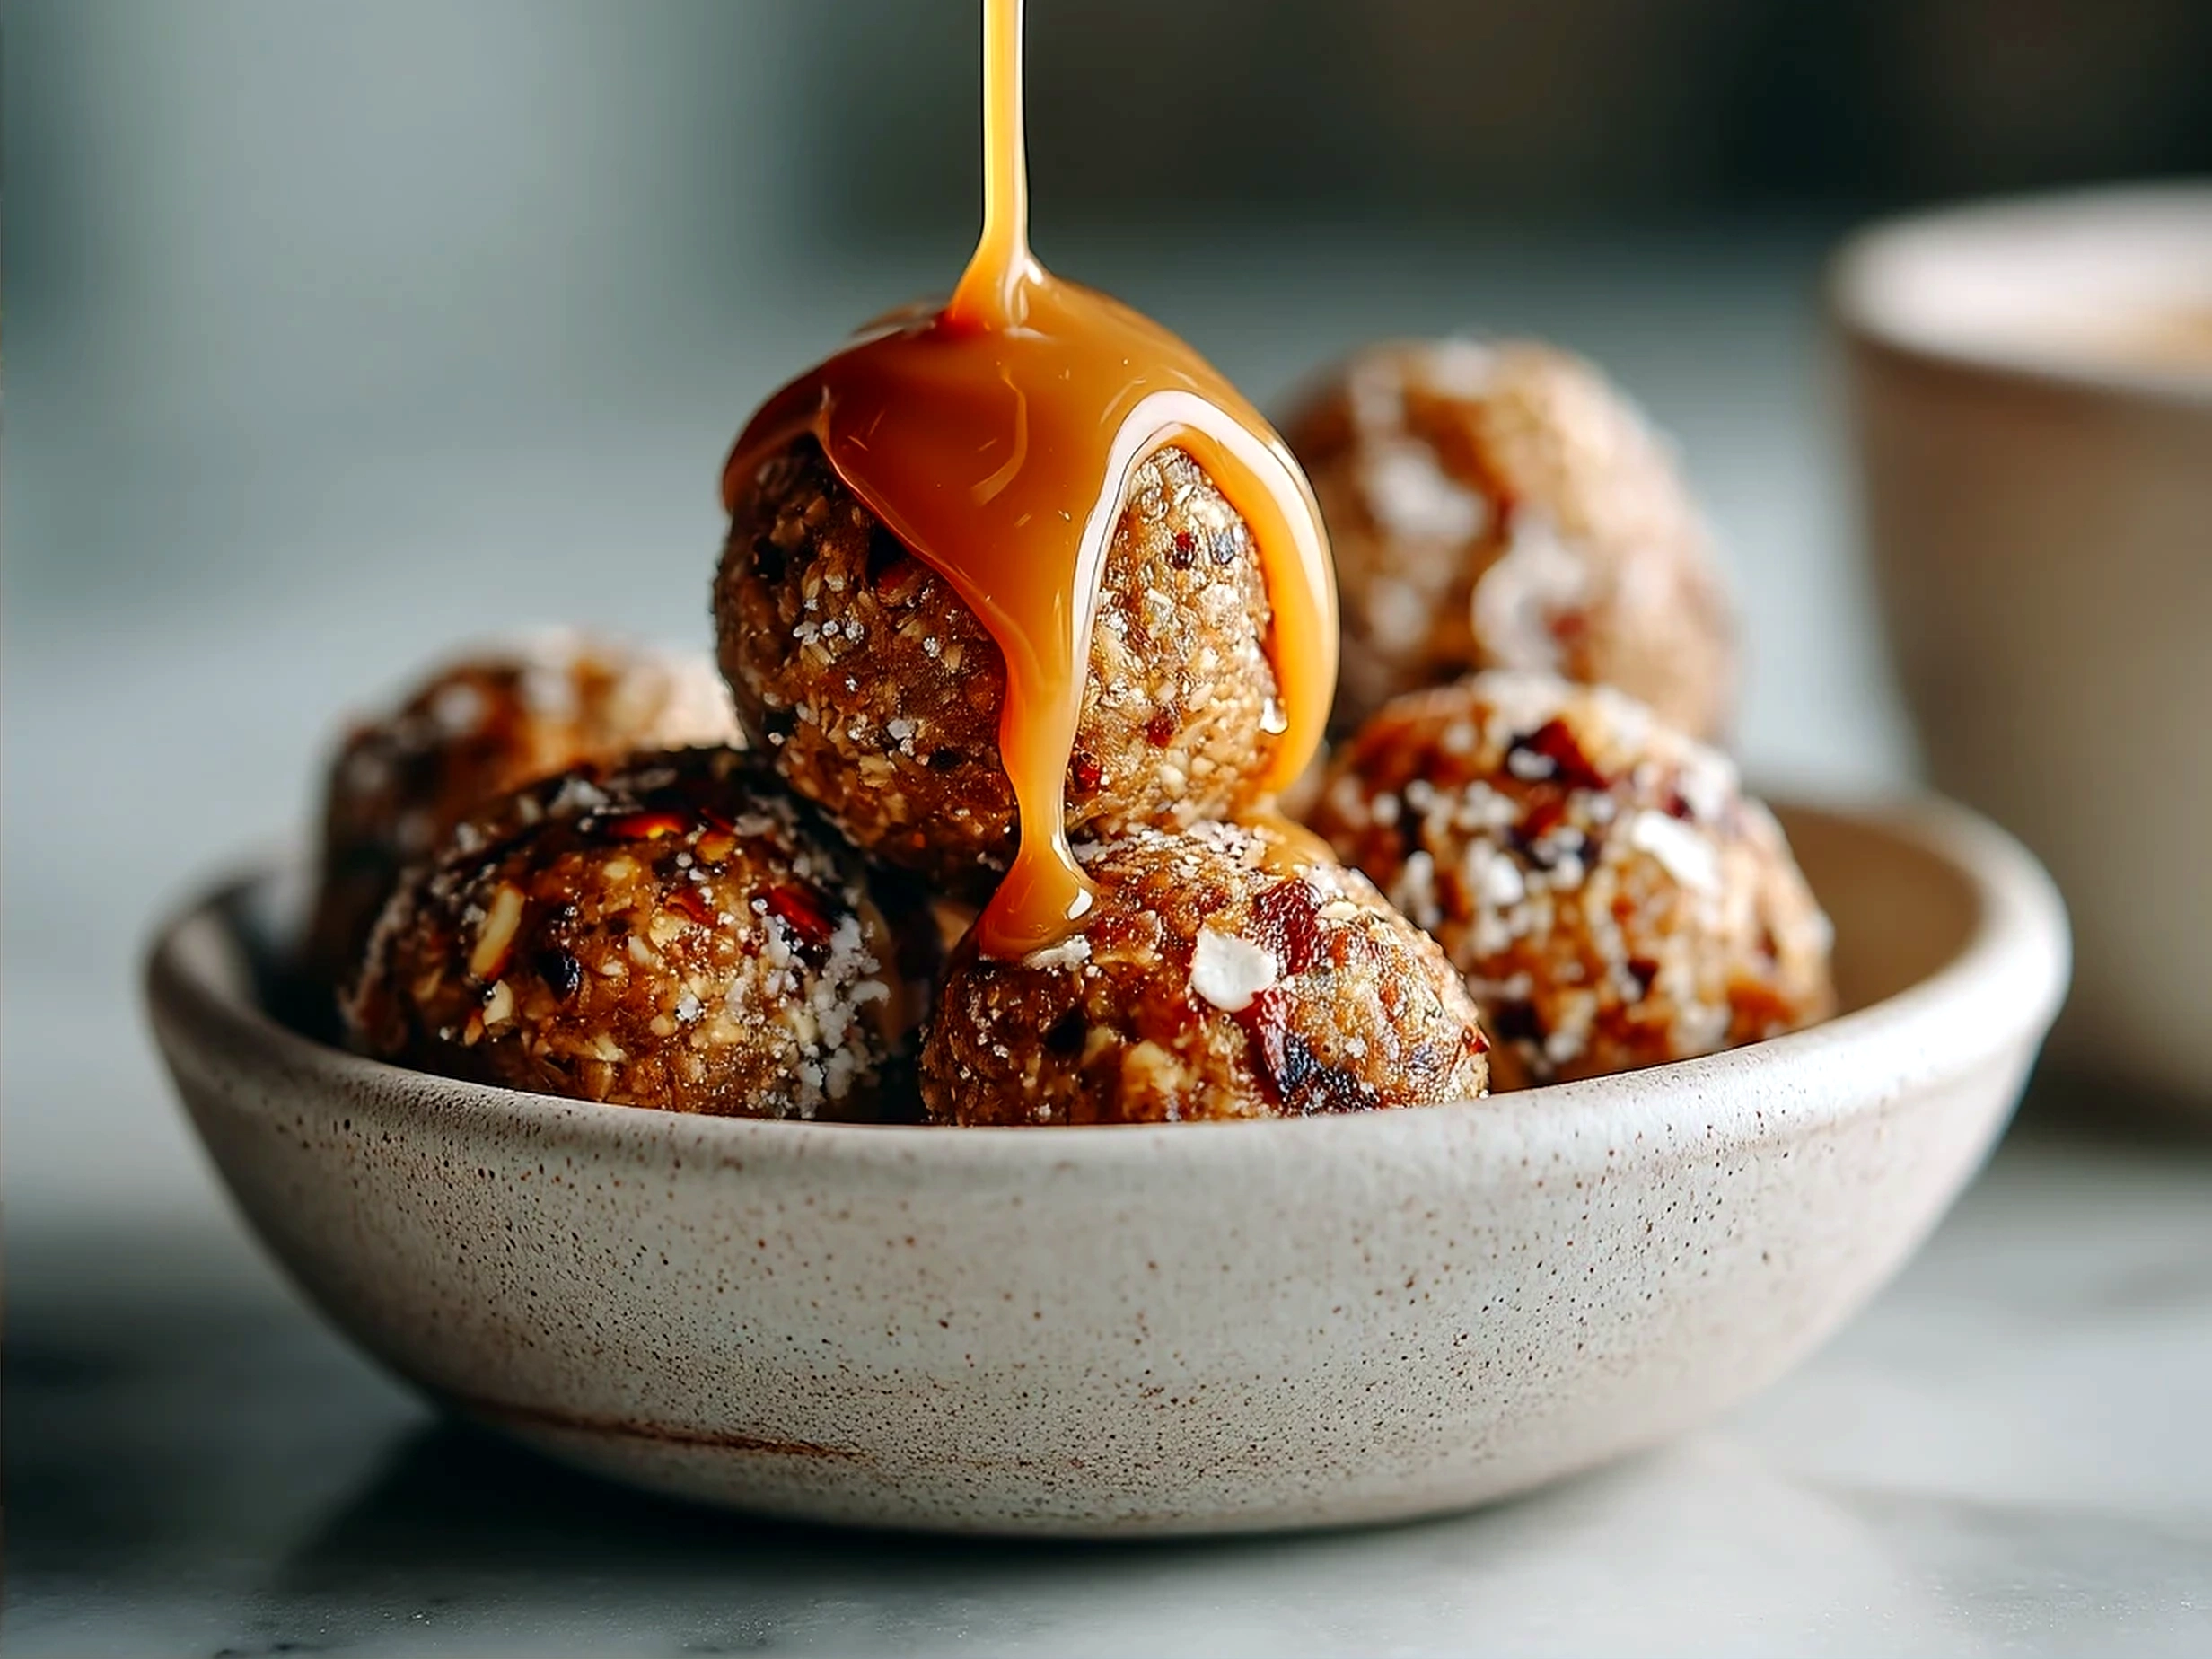
I still remember the exact day I fell in love with the Energy Ball. It was one of those chaotic weekday afternoons when I was juggling a full house: three kids demanding snacks, a partner sneaking into the kitchen, and me trying to plan dinner without losing my mind. I wanted something simple, nourishing, and quick—no complicated dishes or long prep times. That’s when I stumbled upon my first batch of homemade energy balls. Honestly, I wasn’t expecting much, but biting into that first slightly sweet, chewy, nutty ball was like a little kitchen miracle.
This Energy Ball quickly became more than just a snack. It was my go-to when I needed a burst of energy between meetings, a quick pick-me-up post-workout, or something wholesome to toss in the kids’ lunchboxes. It fits so naturally into a balanced, real-life approach to eating because it’s flexible, full of good ingredients, and requires almost zero effort. I love that it’s not about perfection; it’s about feel-good food that sustains you and keeps your energy steady without any guilt or fuss.
What’s exciting is how I tweaked the original recipe over time to suit what I had on hand or my mood. Sometimes more protein for those long workdays, other times just simple, no-bake energy balls with a touch of cocoa and coconut because, why not? This kind of homemade energy ball feels sustainable—I never get bored, and I know exactly what’s inside.
If you’re a fellow home cook looking for simple, nourishing meals or snacks that fit into a busy schedule without stress, this Energy Ball story is for you. I can’t wait to share what I’ve learned along the way, so you can enjoy these healthy snack bites as much as we do here at Just Healthy Bites. And if you want to mix it up, be sure to check out other energy ball variations like the no-bake red velvet snowball truffles here or get inspired by some no-bake energy bites recipes that are just as fuss-free and tasty on sites like No Bake Energy Bites | Gimme Some Oven.
What You’ll Need:
Putting together a batch of these nutritious snack balls is easier than you might think! Here’s my intentionally simple Energy Ball ingredient list:
- 1 cup rolled oats (budget-friendly pantry staple you can find in any grocery store)
- ½ cup natural peanut butter (or almond butter if you want a quick swap)
- ¼ cup honey or maple syrup (whichever you prefer—no stress if you’re out of one!)
- ½ cup ground flaxseed (adds fiber and keeps costs low)
- ¼ cup mini dark chocolate chips (optional but such a nice touch)
- 1 teaspoon vanilla extract (makes a world of difference for flavor depth)
- Pinch of salt (balances out the sweetness)
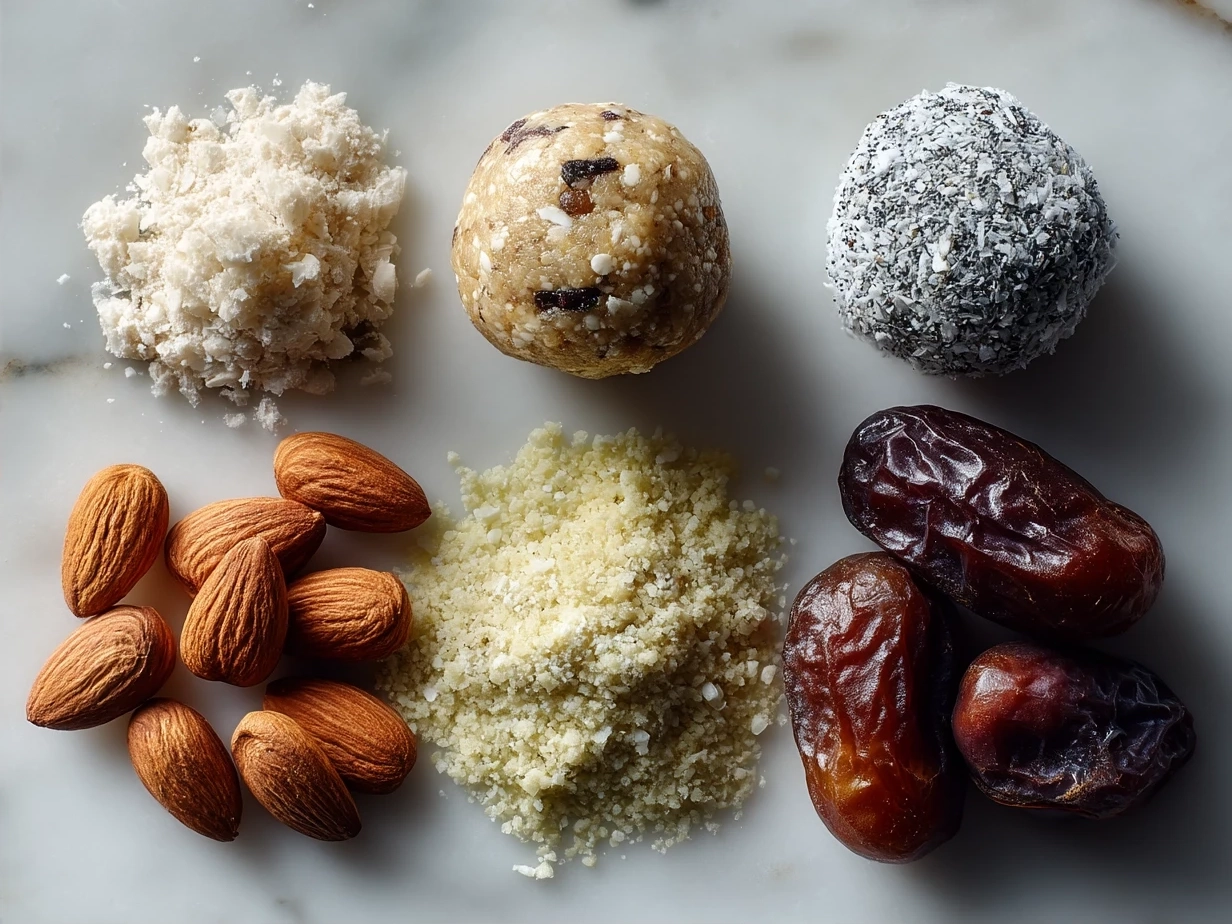
No worries if you don’t have ground flaxseed—I often replace it with chia seeds or finely chopped nuts. These homemade energy balls keep costs low by relying on pantry staples and don’t require fancy ingredients.
For prep shortcuts, I usually use quick oats instead of old-fashioned oats when I need to save time, and nut butters straight from the fridge mix more easily if warmed just a bit in the microwave for about 15 seconds. If you find yourself with leftovers, keep your Energy Balls stored in an airtight container in the fridge for up to a week or freeze them for monthly batch prep.
I love adding extra bits like shredded coconut or a sprinkle of cinnamon, depending on my mood—feel free to personalize! Remember, this Energy Ball ingredient list is intentionally simple because good food doesn’t need to be complicated.
Let’s Make It Together!
Ready to roll up your sleeves and make some Energy Balls? Here’s the step-by-step guide that I walk through in my kitchen—it usually takes about 15 minutes from start to finish.
- Mix dry ingredients first. Start by combining the rolled oats, ground flaxseed, and a pinch of salt in a large bowl. Stir them together so everything gets evenly distributed.
- Add wet ingredients. Next, add the peanut butter, honey (or maple syrup), and vanilla extract. I like to warm the peanut butter slightly if it’s too thick to mix easily. Stir everything together with a wooden spoon or your hand—it might seem sticky, but that’s perfect!
- Fold in chocolate chips. Gently fold in the mini dark chocolate chips. These little bites of sweetness make the Energy Ball more irresistible.
- Shape your balls. Using your hands, roll the mixture into 1-inch balls. If the mixture feels too tacky, pop it in the freezer for 10 minutes—it firms up nicely and makes shaping easier.
- Chill before serving. Place the Energy Balls on a baking sheet lined with parchment paper and put them in the fridge for at least 20 minutes. This helps them set properly for a perfect bite.
While your Energy Ball batch chills, it’s a perfect time to tidy the counter or prep a simple side for a snack plate. Your kitchen should start to smell wonderfully sweet, nutty, and a little like vanilla—always a good sign.
If you worry your Energy Ball mix feels too crumbly or wet, don’t stress. These homemade energy balls are forgiving. Add a little more honey if it’s dry, or a splash of nut milk if it’s too dense. Simplicity wins here!
Here’s a little secret: I used to overcomplicate this by adding all sorts of ingredients. Turns out, sticking to fewer, quality ingredients lets the flavors shine.
How I Love to Serve This!
I enjoy these proteins energy balls in so many ways. On busy weeknights, they’re my quick energy fix between dinner and bedtime stories. For a weekend hike or park trip, they pack perfectly and keep everyone happy. I really love serving the Energy Ball alongside fresh fruit or a small green salad to round out the snack for a feel-good balance.
Sometimes, I tuck one or two into the kids’ lunchboxes, and the positive feedback from their teachers about healthy snack bites is always a win.
Presentation-wise, a little sprinkle of shredded coconut or even rolling the balls in cocoa powder gives a nice touch when I want to make them look special but still “grab-and-go.”
When leftover, they reheat nicely at room temp in just 10 minutes, or you can have them chilled if you prefer that refreshing bite. Seasonal twists like adding dried cranberries or pumpkin pie spices really change things up without fuss.
My friends rave about these Energy Balls when I bring a batch to casual get-togethers. They’re surprised at how wholesome and satisfying they are, especially compared to usual snacks.
If you enjoy the comfort of homemade energy balls, you might also like to try the easy yaki onigiri – delicious grilled rice balls for a savory twist or these cream cheese sausage balls when you want something warm!

Common Questions Answered
Can I make this Energy Ball ahead for meal prep?
Absolutely! These Energy Balls keep well in the fridge for up to a week, making them perfect for meal prep. You can even freeze them in airtight containers for up to a month. Just thaw at room temperature before enjoying. I’ve found having a stash ready saves me so much time during busy weeks.
What if I don’t have all the ingredients for this Energy Ball?
No worries if you’re missing flaxseed or chocolate chips—try swapping flaxseed with chia seeds or omit the chips completely. For natural sweeteners, honey, maple syrup, or agave work similarly. The recipe’s forgiving, so feel free to experiment with what you have.
How can I adjust the flavor of this Energy Ball to my taste?
Love a little spice? Add cinnamon or pumpkin pie spice. Want extra protein? Mix in a scoop of your favorite protein powder. Prefer nut-free? Use sunflower seed butter instead of peanut butter. The best part about homemade energy balls is their flexibility.
Do the Energy Balls taste sweet or savory?
They lean sweet but aren’t overly sugary. The natural nut butter and honey give just a hint of sweetness balanced by oats and flaxseed’s earthiness. Sometimes, I add a pinch of sea salt for balance.
Are these Energy Balls suitable for kids?
Yes! My kids love them, and they’re great for lunchboxes or after school snacks. Just watch for nut allergies if cooking for a group.
Can I bake these Energy Balls?
Most recipes for Energy Balls are no-bake, which is part of their appeal! Baking changes the texture. If you like warm bites, try these easy yaki onigiri instead for a baked option with a similar grab-and-go feel.
What’s the best way to store Energy Balls?
Store in an airtight container in the fridge or freezer. If freezing, thaw in the fridge overnight or on the counter for 10-20 minutes before eating.
I also find it helpful to check out recipes like the No-Bake Energy Bites Recipe on AllRecipes for more ideas or Energy Balls {No Bake with 7 Recipes} – WellPlated.com for inspiration on different flavor combos.
Final Thoughts
This Energy Ball is a staple I come back to again and again because it’s simple, satisfying, and adaptable. It solves so many snack dilemmas with minimal fuss—real-life cooking at its best.
My Favorite Energy Ball Tips:
1. Keep the ingredient list simple—that’s where the magic starts.
2. Warm your nut butter for easier mixing—trust me, it’s a game changer.
3. Don’t be afraid to experiment with add-ins like seeds, spices, or dried fruit—they make it yours.
I’ve tried variations with pumpkin spice, chocolate cherry, and even mocha flavors. The classic peanut butter and chocolate chip combo remains my favorite because it’s comforting and energizing.
I encourage you to make this Energy Ball your own. Swap ingredients, adjust flavors, and share it with friends or family. I hope it brings a little extra nourishment and joy to your everyday routine.
When you have a moment, check out the no-bake red velvet snowball truffles here or the no bake energy bites on Gimme Some Oven for more healthy snack bites ideas.
Give it a try—you’re going to love how easy and delicious this Energy Ball is. Here’s to stress-free, feel-good food made right in your kitchen.
Energy Ball

These Energy Balls are a quick, no-bake snack packed with natural ingredients to boost your energy and satisfy your hunger anytime.
- Prep Time: 10 minutes
- Cook Time: 0 minutes
- Total Time: 10 minutes
- Yield: 12 servings
- Category: Snack
- Method: No-Cook
- Cuisine: American
Ingredients
- 1 cup rolled oats
- 1/2 cup natural peanut butter
- 1/3 cup honey
- 1/4 cup ground flaxseed
- 1/4 cup mini dark chocolate chips
- 1 tsp vanilla extract
- Pinch of salt
Instructions
- In a medium bowl, combine rolled oats, ground flaxseed, and salt.
- Add peanut butter, honey, and vanilla extract to the dry ingredients.
- Mix thoroughly until the mixture is sticky and well combined.
- Stir in the mini dark chocolate chips evenly.
- Using your hands or a small scoop, roll the mixture into 1-inch balls.
- Place the energy balls on a baking sheet lined with parchment paper.
- Refrigerate for at least 30 minutes before serving to firm up.
Notes
Store energy balls in an airtight container in the refrigerator for up to one week for best freshness.