
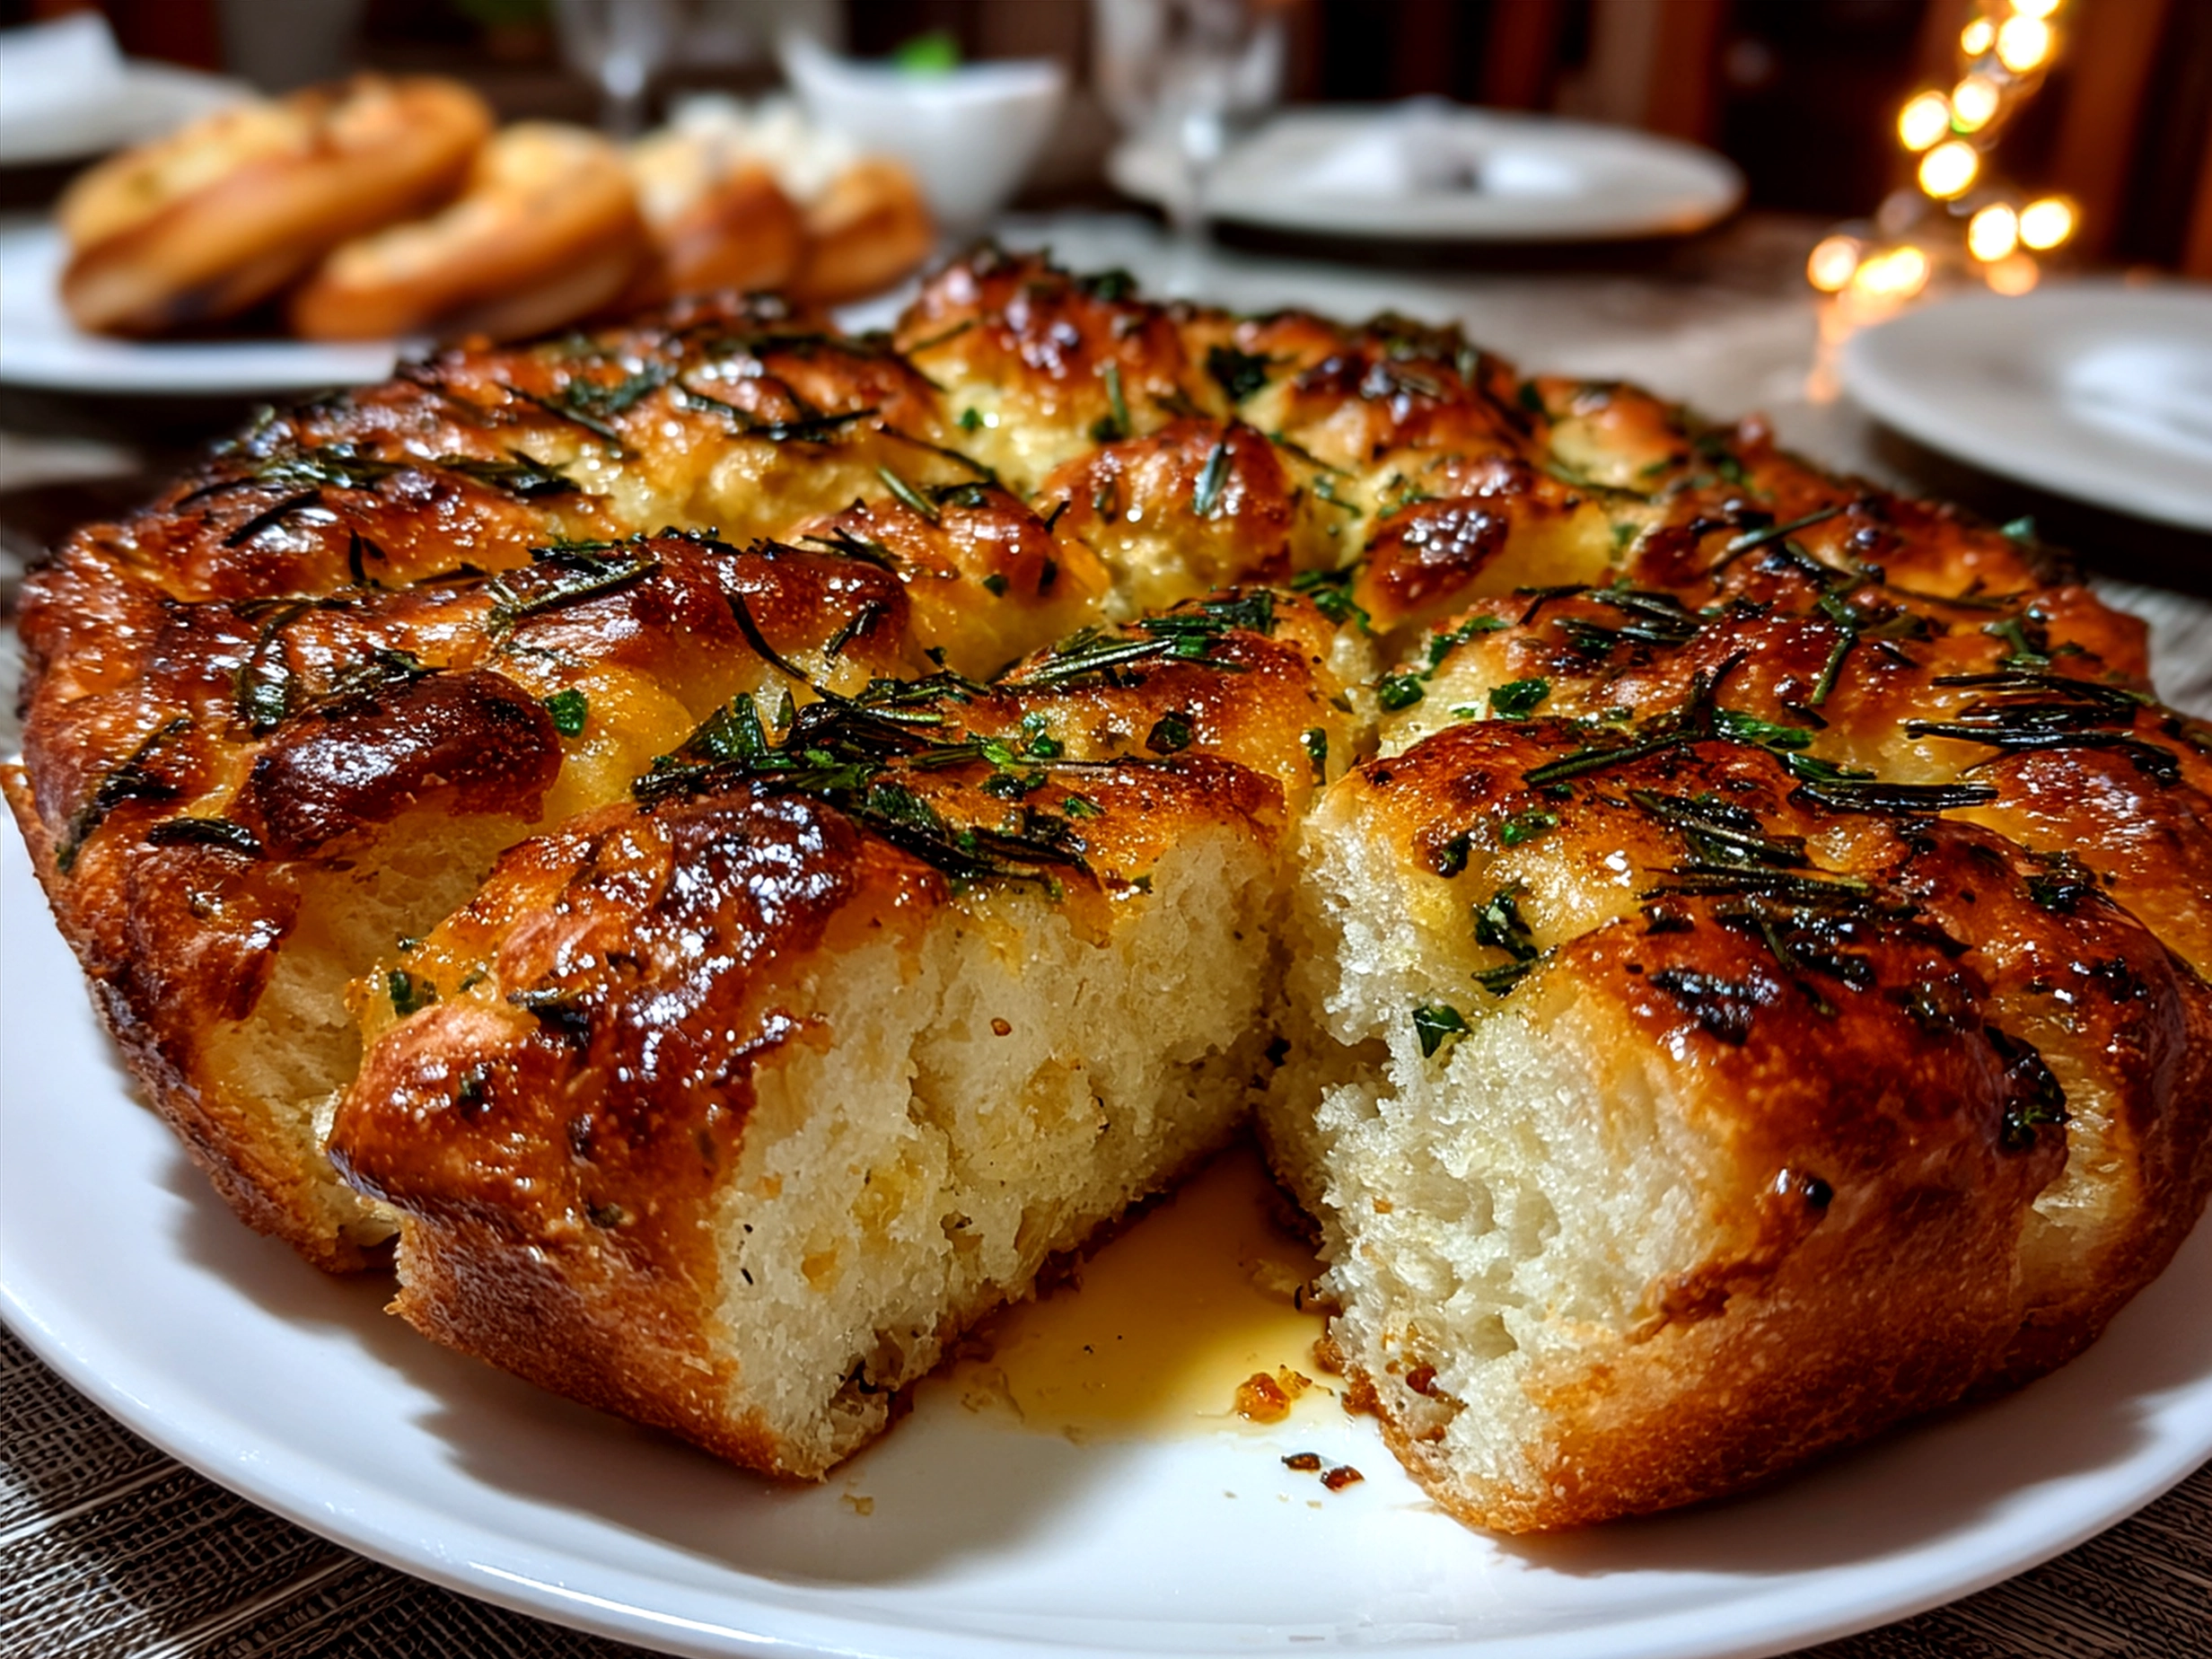
When I first discovered the joy of baking a Focaccia Decorative Loaf, it felt like a little kitchen miracle. I remember it vividly — it was a Saturday morning, and I was in my pretty small kitchen trying to create bread that felt both indulgent and nourishing. I wanted something that could fit into my everyday rhythm without the fuss or stress of a complicated recipe. The idea that a Focaccia Decorative Loaf, with its artisan bread texture and beautiful herbed touches, could be both delicious and balanced really shifted my perspective on baking.
What surprised me most was how this type of Italian focaccia bread could be so versatile. I was used to focaccia as a topping-laden snack or side, but making a decorative bread loaf brought that rustic charm right into a centerpiece form. The decorative bread baking process, with its playful patterns and fresh focaccia bread toppings, made it feel like creating artwork — yet it stayed simple and manageable. That balance of feeling fancy but keeping it real was exactly what I needed for my kitchen life.
Since that morning, the Focaccia Decorative Loaf has become a bit of a staple for me, especially when I want to share something comforting without getting overwhelmed. It’s perfect for weekend hangouts or even just a quiet night with a book and a bit of olive oil for dipping. The best part? It fits into my approach to eating well — without the pressure to be perfect or follow endless rules. A warm, golden herbed focaccia loaf lifts the mood and feels nourishing while being grounded in simple ingredients.
If you’re a fellow home cook looking for an easy, feel-good bread to add some joy to your meals, this Focaccia Decorative Loaf could be just the thing you didn’t know you needed. It welcomes simple swaps, loves little playful toppings, and takes your taste buds straight to the heart of Italy. I’m excited to share the whole story with you, from what you’ll need to all my favorite ways to serve and enjoy this lovely herbed focaccia loaf.
And once you fall for this artisan bread texture and those irresistible focaccia bread toppings, there’s no turning back. You might even start playing around with decorative bread baking yourself — trust me, it’s a fun little creative break in the kitchen! If you want some inspiration before we start, check out this Homemade Cardinal Herbed Focaccia Bread recipe for a beautiful take on herbed focaccia.
The Focaccia Decorative Loaf is a fantastic way to bring warmth and flavor to your kitchen that feels nourishing and doable. Let’s dive in and make this simple but stunning bread your new go-to!
What You’ll Need:
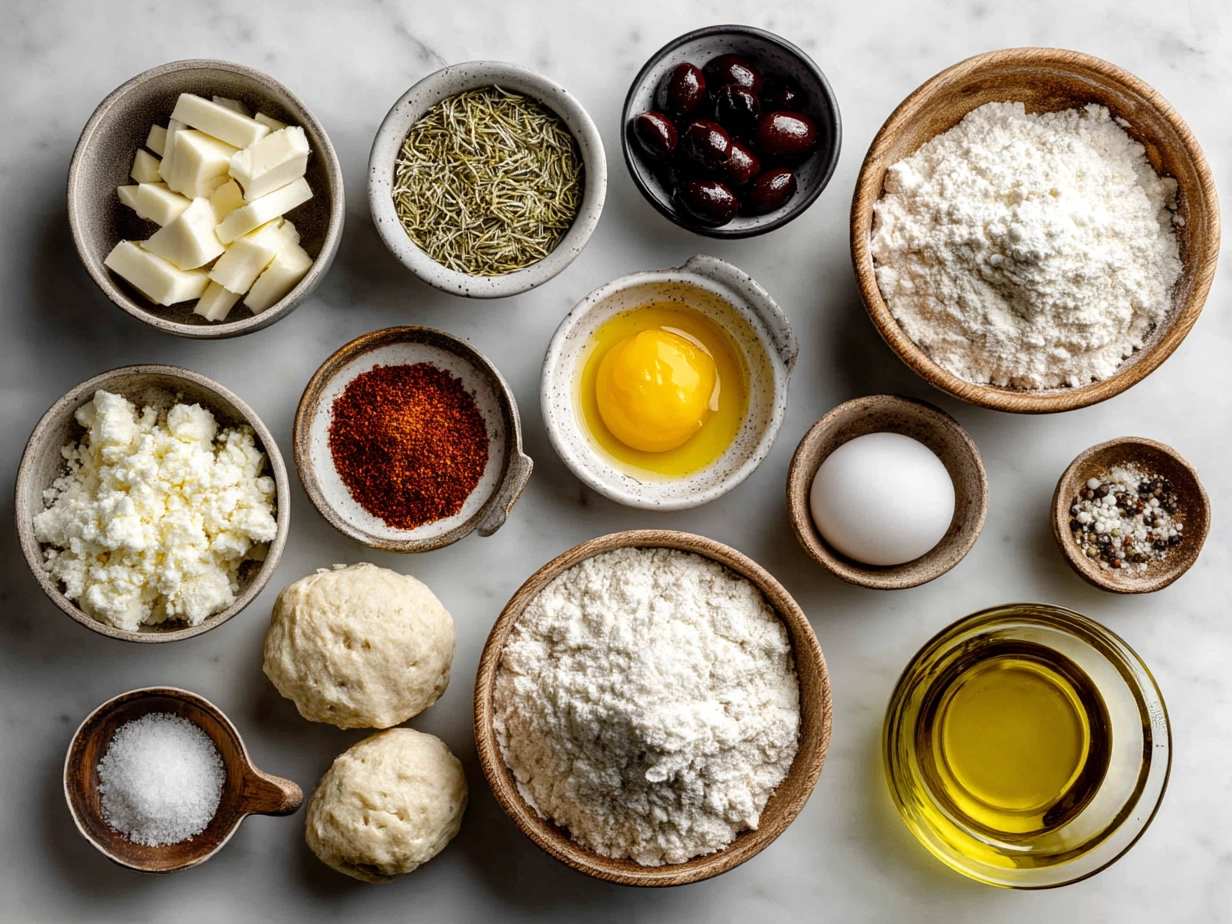
- 3 ½ cups bread flour – This gives the focaccia decorative loaf that chewy artisan bread texture I love. No stress if you don’t have bread flour; all-purpose flour works fine too.
- 1 packet (2 ¼ tsp) active dry yeast – You can find this easily in the baking aisle of any grocery store.
- 1 ¼ cups lukewarm water – Just warm enough to activate the yeast, not too hot.
- 2 tsp sugar or honey – Helps jumpstart the yeast. I often swap honey for a bit more natural sweetness.
- 1 tsp sea salt – Essential for flavor. I like sprinkling a bit extra on top for a salty crunch.
- 3 tbsp extra virgin olive oil (plus more for drizzling) – The star for that rich, glossy finish and bright flavor.
- Fresh herbs (rosemary, thyme, oregano) – Totally optional but highly recommended for an herbed focaccia loaf. You can find fresh sprigs in the produce section year-round or use dried herbs if that’s easier.
- Coarse sea salt or flaky salt for topping – Adds great texture.
- Optional focaccia bread toppings: Sliced cherry tomatoes, thinly sliced red onions, olives, or even thin carrot ribbons. These toppings turn your Focaccia Decorative Loaf into an artwork and bring extra flavor.
For budget-friendly notes, this focaccia decorative loaf keeps costs low by relying on staple pantry ingredients like flour, yeast, and olive oil. Fresh herbs, if you have a garden or a small pot on your windowsill, come at no extra cost and feel so special. Prep shortcuts include mixing the dough in your stand mixer if you have one or even using a food processor with a dough blade to save time and effort.
If you make extra (and trust me, you might), leftovers can be stored in an airtight container at room temperature for up to two days or tucked into a zip-top bag and frozen for longer. Reheat briefly in the oven to freshen it up.
I love adding extra rosemary right on top before baking—it makes my kitchen smell like an Italian farmhouse and really deepens that flavor in the focaccia decorative loaf. If you want a crunchy crust, pop it under the broiler for just a minute or two after baking—it’s my little bread trick!
If you want an eye-catching finish on your focaccia decorative loaf, take a peek at this How To Make Focaccia Bread Art With Vegetables + Herbs – Sugar Geek Show for some inspiring plating and decorating ideas. It’s perfect for turning your loaf into an artisan masterpiece without any stress.
Let’s Make It Together!
- Activate your yeast: In a small bowl, stir the lukewarm water with sugar (or honey) and sprinkle the active dry yeast on top. Let it sit for about 5-10 minutes until it gets foamy and bubbly. That’s your sign that the yeast is alive and ready for the focaccia decorative loaf magic.
- Mix the dough: In a large bowl, combine the bread flour and sea salt. Pour in the yeast mixture along with 2 tablespoons of olive oil. Stir with a wooden spoon or your hands until you have a rough dough. Don’t worry if it looks a bit shaggy — that’s normal.
- Knead it: Turn the dough out onto a floured surface and knead for about 8-10 minutes until it’s smooth, elastic, and springs back when poked. If you’re using a stand mixer, use the dough hook on medium speed for the same amount of time. Kneading well gives your herbed focaccia loaf that springy artisan bread texture we’re after.
- First rise: Lightly oil a clean bowl, place your dough inside, and cover with a damp tea towel or plastic wrap. Let it rest in a warm, draft-free spot for about 1 to 1.5 hours, or until it doubles in size. While waiting, it’s a perfect moment for setting the table or prepping a simple side dish — no rush in the kitchen today.
- Prepare the pan: Drizzle a baking sheet or a 9×13-inch pan generously with olive oil—this helps give the bottom of your focaccia decorative loaf that golden, crispy finish.
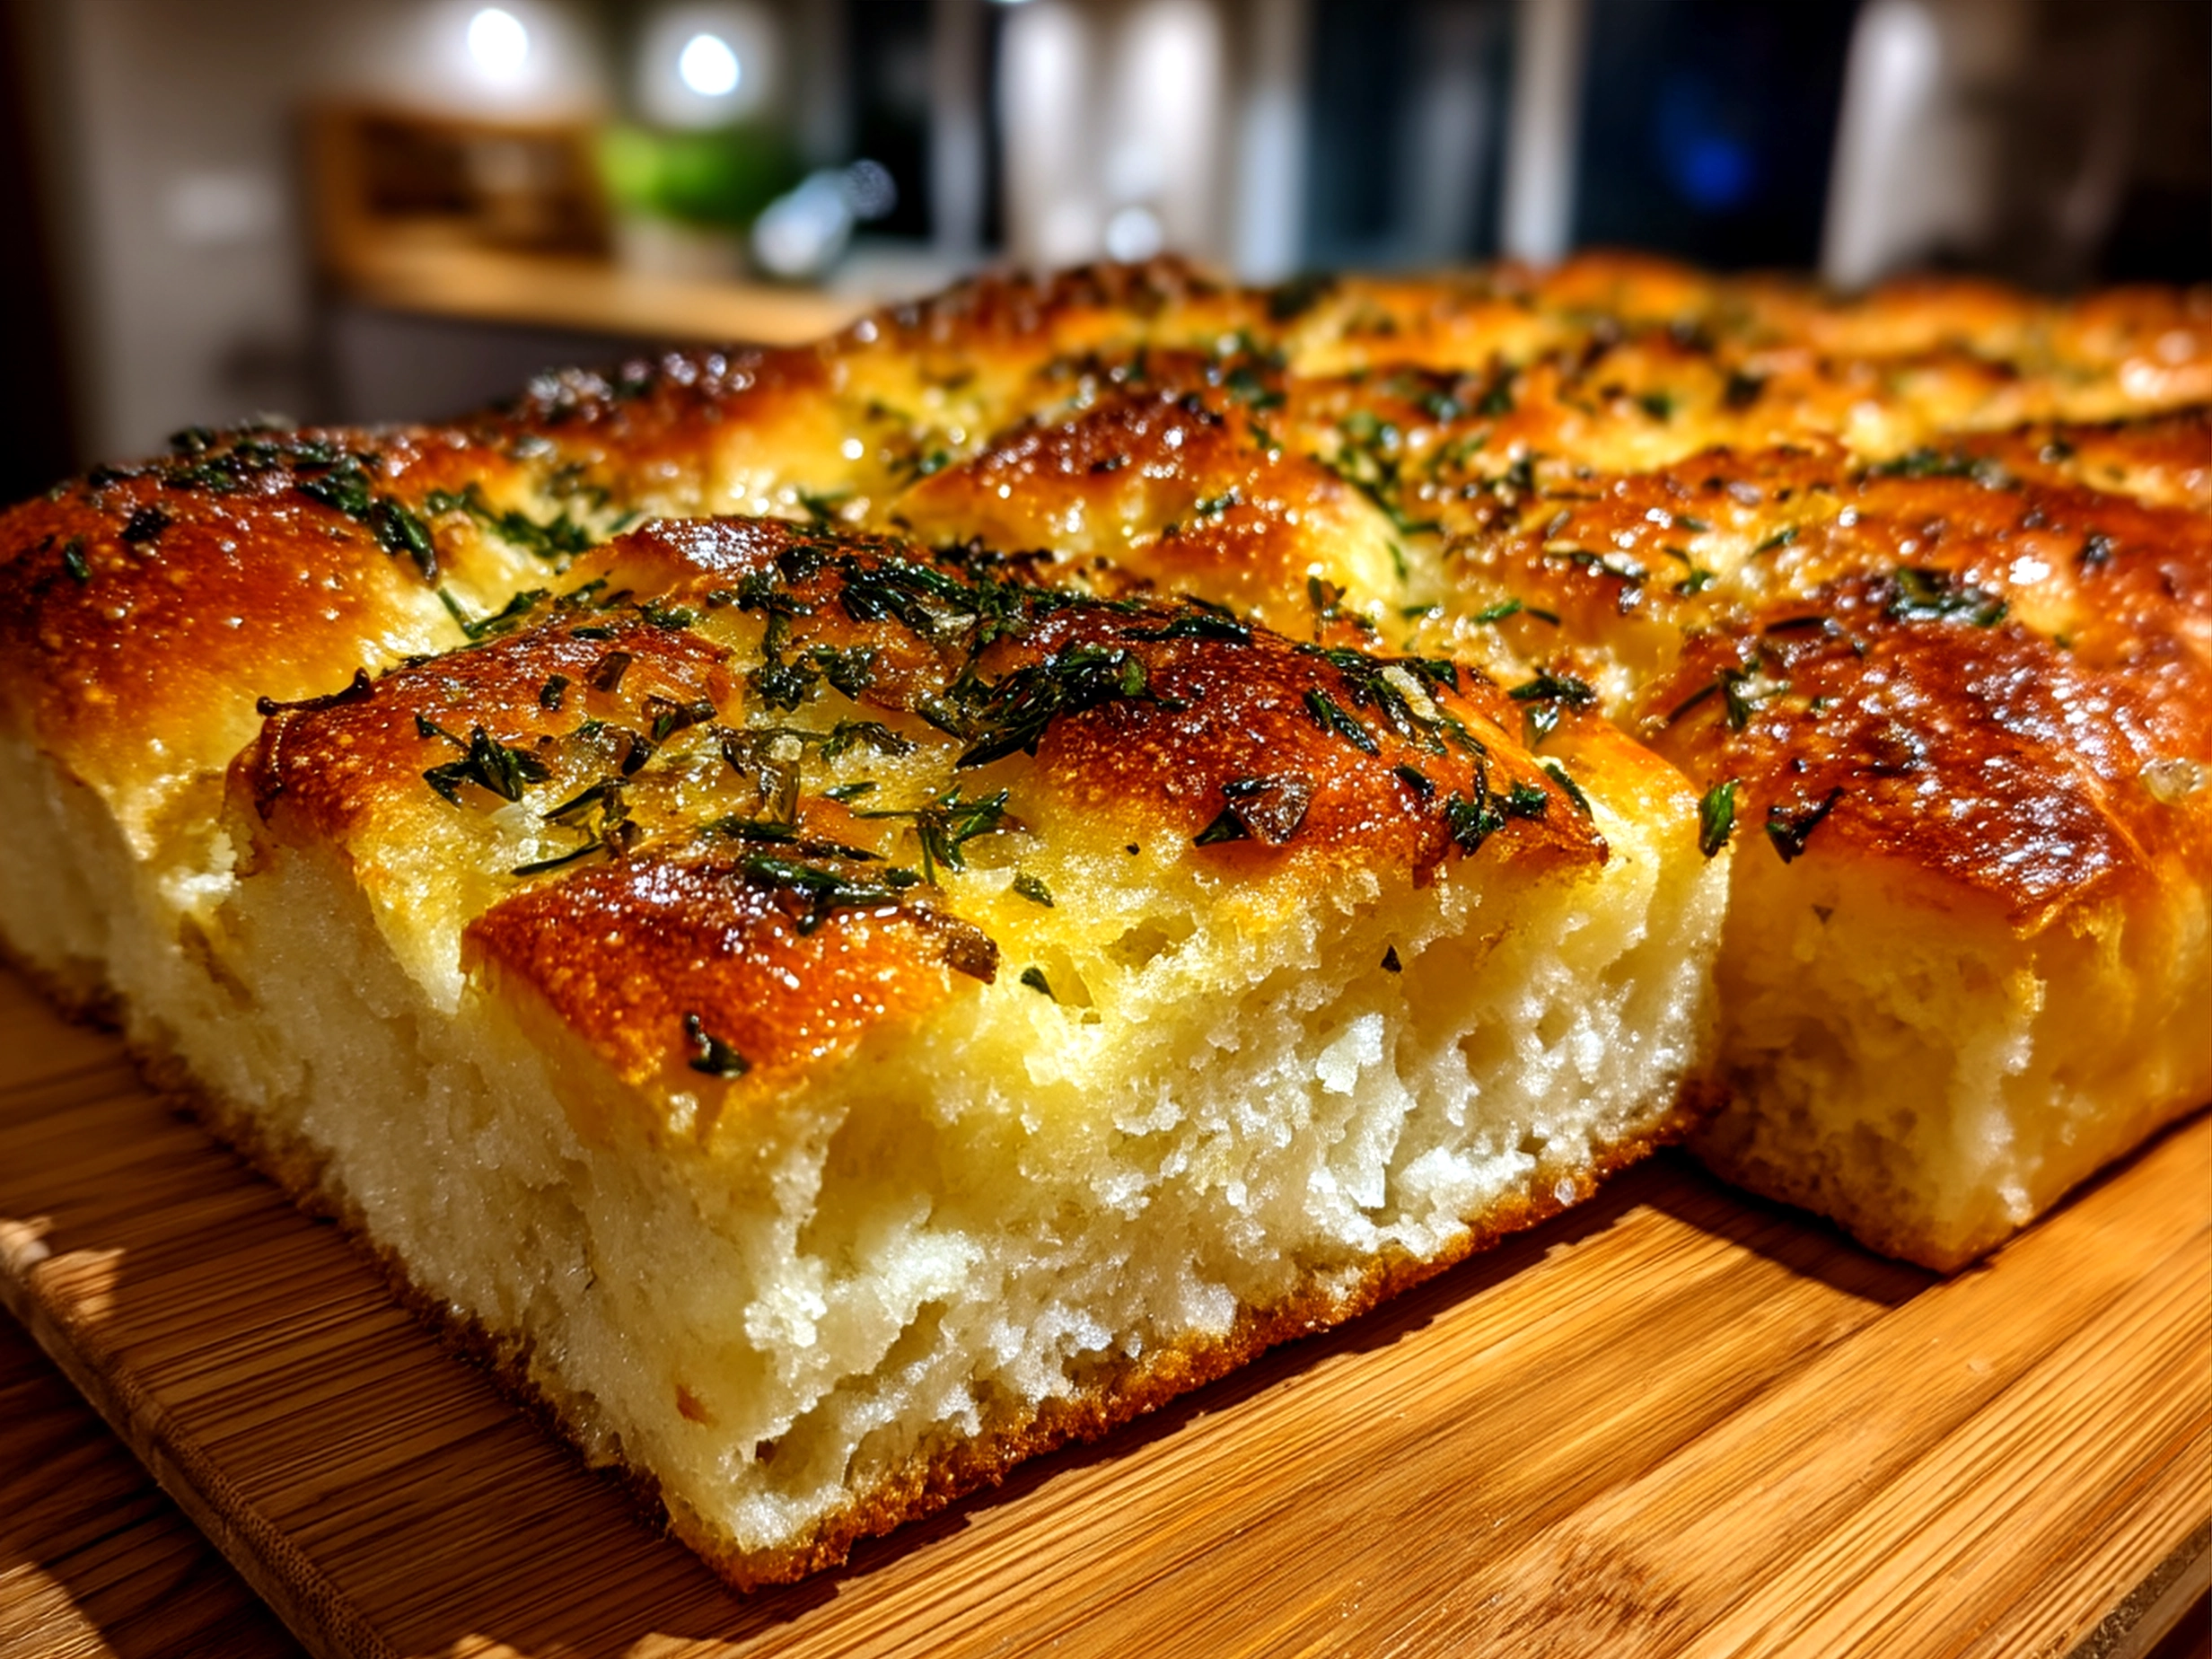
- Shape and decorate: Punch down your dough gently to release air, then transfer it to the oiled pan. Press the dough out gently to fit the pan. Use your fingers to create dimples all across the surface—this makes room for the olive oil and toppings and is part of the fun in decorative bread baking.
- Add toppings: Drizzle about 1 tablespoon of olive oil over the top, sprinkle fresh herbs and flaky salt evenly, and arrange any focaccia bread toppings you like. I love a mix of rosemary sprigs and halved cherry tomatoes for color and flavor.
- Second rise: Let your dough rise again for about 20-30 minutes. It will puff up slightly and smell gorgeous—this is your cue that your focaccia decorative loaf is nearly ready.
- Bake: Preheat your oven to 425°F (220°C). Bake the focaccia decorative loaf for about 20-25 minutes, until it’s golden-brown and sounds hollow when tapped on the bottom. Don’t worry if your loaf spreads a little or your toppings shift—it still tastes amazing!
- Cool and enjoy: Let the focaccia decorative loaf cool for at least 10 minutes before slicing. This helps the crumb set and makes cutting easier.
Remember, while your focaccia decorative loaf is baking, take a moment to breathe or sip your coffee. Cooking is about enjoying the process, not just rushing to the finish line.
If you want a little inspiration for toppings that go beyond herbs, check out this Delicious homemade focaccia bread recipe to see real home cooks’ creative takes on focaccia bread toppings.
In my kitchen, this focussed decorative loaf usually takes about 1 hour and 45 minutes from start to finish, most of it hands-off. It’s a lovely way to slow down a bit and have a tasty bread to share without sweating every detail.
How I Love to Serve This!
This Focaccia Decorative Loaf is one of my favorite companions for so many meals that it almost feels like it has its own personality. I love tearing off chunks alongside a bright, fresh salad or pairing it with roasted veggies. The artisan bread texture makes it perfect for dipping in olive oil mixed with a little balsamic vinegar or a herby whipped feta spread.
For quick weeknights, it makes a complete meal if you add some cheeses, olives, and sliced cured meats—simple and satisfying. On weekends, I bring it to casual gatherings, where the decorative bread baking and focaccia bread toppings always get oohs and ahhs from friends. One time, I sliced a herbed focaccia loaf thin and toasted it for bruschetta—it was gone before I knew it!
Presentation is easy but makes a difference: serve on a wooden board with small bowls of olive oil, a sprinkling of sea salt, and a scattering of fresh herbs. You can also sprinkle extra rosemary or flaky sea salt right before serving for a fresh touch.
Got leftovers? I like to make a quick panzanella salad with day-old focaccia decorative loaf pieces, fresh tomatoes, cucumbers, and a mustardy vinaigrette. It turns yesterday’s bread into a new, nourishing dish.
If you’re feeling seasonal, swap in toppings that match what’s fresh near you—like caramelized onions in the fall or roasted garlic in the winter. One of my all-time favorite variations is adding thin slices of zucchini and a little parmesan on top before baking—it adds great flavor and texture.
And for those curious about sweet twists, I once made a Jam Donut Focaccia Recipe Delight version that combined fruit jam as a topping for a lightly sweet bread. Fun, unexpected, and loved by everyone.
Common Questions Answered
Can I make this Focaccia Decorative Loaf ahead for meal prep?
Yes! You can prepare the dough the day before and let it rise slowly in the fridge. The next day, let it come to room temperature before shaping and baking. This slow fermentation deepens flavor and makes it perfect for meal prep.
What if I don’t have all the ingredients for this Focaccia Decorative Loaf?
No worries at all. If fresh herbs aren’t handy, dried herbs work just fine. You can swap honey for sugar or skip toppings altogether for a plain herbed focaccia loaf. The base dough is very forgiving.
How can I adjust the flavor of this Focaccia Decorative Loaf to my taste?
Play with herbs like basil or sage, or add a pinch of crushed red pepper flakes for heat. Using different olive oils can also subtly change the flavor. Don’t be afraid to add your favorite focaccia bread toppings or simply more sea salt on top.
Do I have to create the decorative patterns?
Not at all—it’s decorative bread baking for fun, not perfection. The dimples made by your fingertips also give the focaccia decorative loaf its characteristic look and help olive oil pool, so aim for dimples even if fancy patterns don’t happen.
How do I know when the focaccia decorative loaf is done baking?
It should be golden brown and sound hollow when you tap the bottom. If you have a thermometer, 200°F (93°C) inside means it’s ready. Your kitchen will smell amazing, which always helps!
Can I freeze leftover focaccia decorative loaf?
Absolutely. Wrap it tightly or store in a zip-top bag and freeze for up to a month. Thaw at room temperature and warm in the oven for fresh texture.
What’s the best way to store leftovers?
Keep your focaccia decorative loaf in an airtight container or cover tightly with foil. Room temperature storage works well for a day or two. For longer storage, freezing is your friend.
If you want more ideas for this style of bread, this Homemade Cardinal Herbed Focaccia Bread Recipe is a lovely resource with tips from fellow home cooks.
Final Thoughts
This Focaccia Decorative Loaf has become a little favorite in my kitchen routine because it strikes that rare balance of being nourishing and indulgent without being complicated. It’s a recipe I return to when I want food that feels like a hug but fits into the flow of real life.
My Favorite Focaccia Decorative Loaf Tips:
– Use your fingertips to create deep dimples for the best texture and oil absorption.
– Don’t skip the second rise—this step makes the dough light and airy.
– Be generous with olive oil; it really brings out those classic focaccia flavors.
I’ve tried variations with caramelized onions, sun-dried tomatoes, and even olives stuffed with cheese. Each one brings its own twist but I most often come back to a simple rosemary-herb focaccia decorative loaf sprinkled with flaky sea salt.
If you want to mix up your baking routine, this loaf welcomes creativity and simple swaps. It’s a dish you can make your own while keeping that delicious Italian focaccia bread soul alive.
I hope you have as much fun making and sharing this cozy herb-topped focaccia decorative loaf as I do. Feel free to get playful with toppings, share it with friends, and savor the moments around the table. For more simple, nourishing recipes, don’t miss my take on the Hidden Heart Chocolate Loaf Cake for a sweet finish to any meal.
Here’s to enjoying food that feels good and fits your everyday life. You’ve got this!
If you want to dive deeper into decorative bread baking, these resources are such great inspiration: the Delicious homemade focaccia bread recipe group shares lots of real-life versions that will inspire your next loaf adventure. Happy baking, friend!
Focaccia Decorative Loaf

This Focaccia Decorative Loaf is a beautifully crafted Italian bread, infused with olive oil and herbs, perfect for impressing guests or elevating any meal.
- Prep Time: 15 minutes
- Cook Time: 25 minutes
- Total Time: 1 hour 50 minutes
- Yield: 8 servings
- Category: Dinner
- Method: Baked
- Cuisine: Italian
Ingredients
- 3 1/2 cups all-purpose flour
- 1 packet active dry yeast (2 1/4 tsp)
- 1 1/4 cups warm water (about 110°F)
- 1/4 cup extra virgin olive oil, plus more for drizzling
- 1 1/2 tsp salt
- 1 tbsp sugar
- Fresh rosemary sprigs
- Sea salt flakes for topping
- Optional: cherry tomatoes or olives for decoration
Instructions
- In a small bowl, dissolve yeast and sugar in warm water. Let sit for 5-10 minutes until foamy.
- In a large mixing bowl, combine flour and salt. Make a well in the center and add the yeast mixture and 1/4 cup olive oil.
- Mix until a sticky dough forms. Knead on a floured surface for 8-10 minutes until smooth and elastic.
- Place dough in an oiled bowl, cover with a damp cloth, and let rise in a warm place for 1 to 1 1/2 hours until doubled in size.
- Punch down the dough and transfer it to a greased baking sheet. Press it out gently into an oval or round shape about 1 inch thick.
- Using your fingers, create deep dimples all over the surface of the dough.
- Arrange rosemary sprigs and optional cherry tomatoes or olives decoratively in the dimples.
- Drizzle generously with olive oil and sprinkle sea salt flakes on top.
- Cover and let rise for another 30-45 minutes.
- Preheat oven to 425°F (220°C). Bake the focaccia for 20-25 minutes until golden brown.
- Remove from oven and cool slightly before slicing and serving.
Notes
For an extra aromatic touch, brush the baked focaccia with garlic-infused olive oil just after baking.